Live Chat: LinkLive from Revation Systems
LinkLive Banking from Revation Systems is a secure cloud-based service that lets you engage with customers anywhere at any time using digital messaging, voice, and video chats.
Contents
Tools
The LinkLive Banking suite includes the following tools:
|
Program |
Description |
Who will use this? |
|
LinkLive Chat |
Allows customers to initiate text chats, voice, or video communications with your customer service representatives. |
Your Digital Banking Customers |
|
Reva |
AI-powered Chatbot to help you automate and route text communication. |
System-generated function that routes chats to the appropriate Customer Service queue based on keywords. |
|
Revation Communicator |
The central hub used for managing, queuing, and routing all chat, phone, and video communications. Must be installed on all PCs used to provide customer support through LinkLive Banking.
Note: installation procedures may vary depending on development. |
Customer Service Representatives, Digital Banking Administrators |
|
LinkLive Administrator |
Management hub for adding and grouping your customer service representatives within the system. |
Digital Banking Administrators |
|
Measuring, Monitoring & Planning (MMP) Portal |
Used to measure customer support statistics, monitor performance, and plan scheduling for peak hours. |
Digital Banking Administrators |
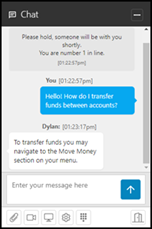
Customer Interface
Customers will be able to initiate communication with a customer service representative at your bank by clicking on the Chat icon within Digital Banking.
Within the chat window, the customer and representative can switch to voice or video if needed. The customer can also securely share a file with the representative and vice versa.
Once the chat session is finished, the customer can download a copy for their reference. An archive copy is automatically stored for your bank to provide a complete audit trail and reporting capabilities.
LinkLive Banking Setup Process
Once your bank has decided to take advantage of LinkLive Banking, our CSI Digital Implementations Team will reach out to set up a meeting. In this meeting, you will be provided access to user guides, training videos, and all required setup information. The Implementations Team can also answer any questions you have about the product. See below for a step-by-step overview of the setup process.
-
Let your CSI Relationship Manager know that you are ready to set up LinkLive Banking.
-
CSI's Digital Implementations Team will contact your bank to set up a meeting. Identify the bank personnel that should attend. CSI recommends inviting the Project Manager and an IT Representative for this initial meeting.
-
Complete the "Admin Setup Template Chat" form provided by Implementations and return to the Implementations Representative.
-
The Implementations Team will provide your bank with User Guides, Setup Documentation, Training Videos, and a demo site.
-
Determine the Groups and Roles you will maintain within LinkLive Banking for routing customer questions. These are called "Hunt Groups." For example, you might want to establish a Public Website Hunt Group, Digital Banking Hunt Group, NuFund Hunt Group, etc. The Implementations Team will build the Hunt Groups for your bank.
-
Using the provided documentation and assistance from your Implementations Representative, have your Bank Administrator begin setting up the User Profiles.
-
Download and install the Revation Communicator on any PC that will be used to interact with customers through LinkLive Banking. Step-by-step instructions can be found in the Communicator Installation Guide.
Note: This step may no longer be necessary depending on developments at Revation.
-
LinkLive Banking will be installed and tested by your bank before going "live."
-
Ensure that your customer representatives have reviewed the provided documentation, demo site, and training videos.
-
Notify your Implementations Representative when you are ready to go "live."
LinkLive Banking Desktop Screen Sharing
The LinkLive Banking feature now offers desktop screen sharing. This tool will allow customer service agents to provide quick, efficient assistance to users.
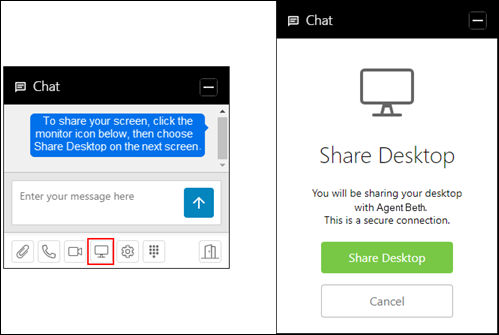
-
During a chat session, the user will click the Monitor icon in the chat tool bar to start a screen share, then click Share Desktop in the pop-up screen to continue.
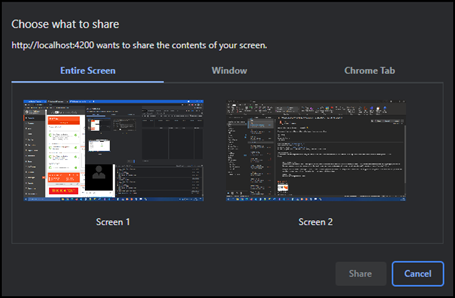
-
On the Choose What to Share screen, the user will need to select the screen, window, or browser tab with the relevant information, then click Share.
-
The screen will now be displayed to the customer service agent. The user will see their screen being shared in the chat window.
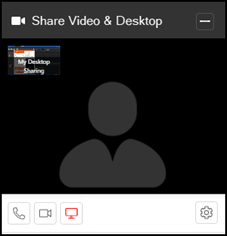
-
To leave the screen share and return to the chat, the user can click the Monitor icon in the chat tool bar.